react-router-dom

리액트를 위한 라우팅 라이브러리, 사용자가 원하는 경로로 보내는 과정.
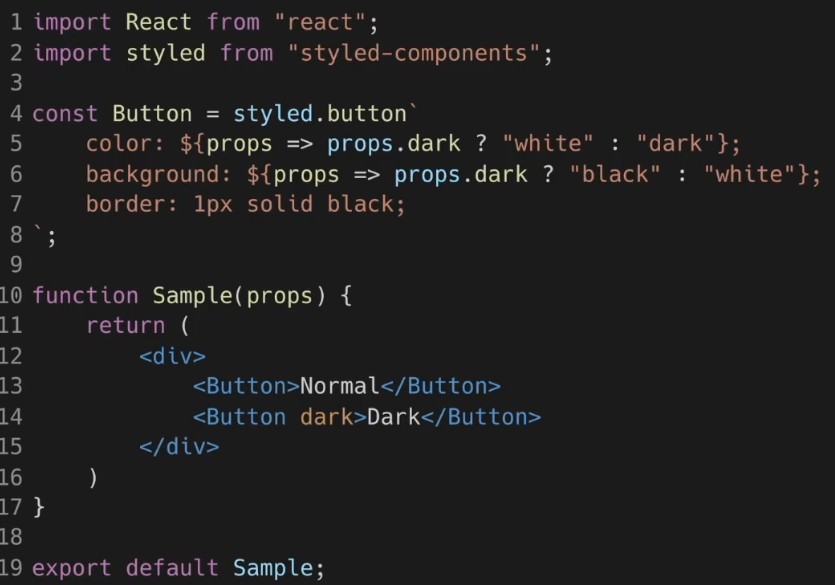
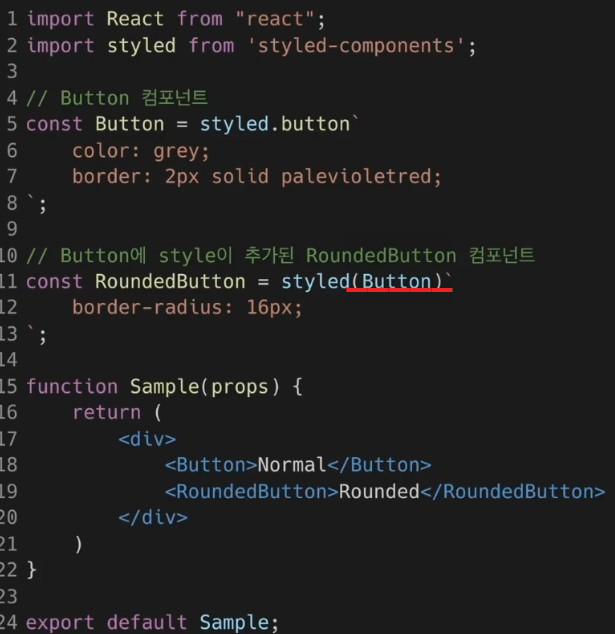


사용법


BrowserRouter는 리액트에서 Routes를 사용할 수 있게 해주는 컴포넌트, Routes와 Route 는 실제로 라우팅 경로를 지정하게 해주는 컴포넌트


여기서 path로 경로를 설정하고, element는 경로가 일치할 경우 렌더링할 컴포넌트를 지정한다.
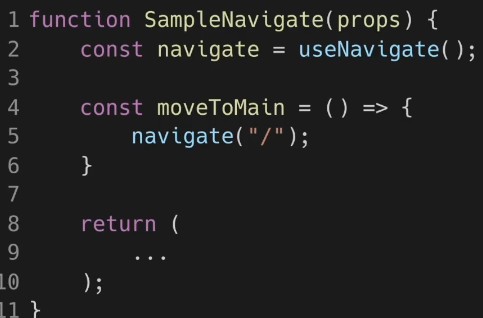


useNavigate() 훅

페이지 이동을 위해 제공하는 훅

파라미터로 이동할 path를 넣어주면 된다.


https://reactrouter.com


Home v6.26.1 | React Router


reactrouter.com

더 자세한 걸 보고 싶다면 해당 사이트에서...


실습 : App.js 수정

App 컴포넌트는 가장 처음으로 렌더링되는 컴포넌트이다.

import React from "react";
import {
  BrowserRouter,
  Routes,
  Route
} from "react-router-dom";
import styled from "styled-components";
import MainPage from "./component/page/MainPage";
import PostWritePage from "./component/page/PostWritePage";
import PostViewPage from "./component/page/PostViewPage";

const MainTitleText = styled.p`
  font-size: 24px;
  font-weight: bold;
  text-align: center;
`;

function App(props) {
  return (
    <BrowserRouter>
      <MainTitleText>미니 블로그</MainTitleText>
      <Routes>
        <Route index element={<MainPage />} />
        <Route path="post-write" element={<PostWritePage />} />
        <Route path="post/:postId" element={<PostViewPage />} />
      </Routes>
    </BrowserRouter>
  );
}

export default App;

마지막 Route를 보면 경로에 :postId가 보이는데, 콜론을 사용하는 경우 실제 컴포넌트에서 useParams() 훅을 사용해 아이디 파라미터 값을 가져올 수 있다.

'React' 카테고리의 다른 글

[React] Appendix A. 리액트 버전18  (3) 2024.09.02
[React] styled-component  (0) 2024.08.23
[React] Context  (0) 2024.08.21
[React] Composition 방법과 Inheritance  (0) 2024.08.20
[React] 실습 : 섭씨온도, 화씨온도 표시하기  (0) 2024.08.19

4)
    public static int getMax(int a, int b) {
        int result;
        result = Math.max(a, b);

        return result;
    }


5)
    public static boolean isPrime(int num) {
        boolean result;
        result = false;
        int count = 0;

        for (int i = 1; i <= num; i++) {
            if( num % i == 0 ) {
                count++;
            }
        }
        if (count == 2) {
            result = true;
        }

        return result;
    }


6)
    public static String[] filterStrings(String... input) {
        String[] output;
        int count = 0;              // 배열의 길이를 알기 위해
        for (String s : input) {
            if (s == null){
                continue;
            }
            if (s.trim().length() >= 3 && s.trim().length() <= 4){
                count++;
            }
        }
        output = new String[count]; // output 길이 설정
        count = 0;                  // 인덱스용
        for (String s : input) {
            if (s == null){
                continue;
            }
            if (s.trim().length() >= 3 && s.trim().length() <= 4){
                output[count] = s.trim();
                count++;
            }
        }

        return output;
    }


7)
    public static double getMedian(int... input) {
        double output;
        int max = 0;
        int min = 0;
        boolean minOrig = true;
        for (int num : input) {
            if (minOrig) {
                minOrig = false;
                min = num;
            }
            if (max < num) {
                max = num;
            }
            if (min > num) {
                min = num;
            }
        }
        output = (double) (min + max) / 2;
        return output;
    }


8)
    public static boolean isStraight(char[] input) {
        boolean result;
        result = true;          // 일단 true
        int prevNum = 0;        // 이전 번호
        boolean first = false;  // 첫번째 비교냐 아니냐의 여부

        for (char c : input) {  // for문으로 문자들을 돌림
            int currentNum = c; // 문자를 숫자화해서 현재 번호에 저장
            if ( currentNum - 1 != prevNum && first) {  // 이전 번호가 현재 번호에서 -1 한 것과 다른가?
                result = false;                     // 다를 경우 false
            }
            first = true;           // 처음 for문 돌릴땐 위의 if문은 그냥 통과
            prevNum = currentNum;   // 이전 번호에 현재 번호 저장
        }

        return result;
    }


'코딩 문제(JavaScript)' 카테고리의 다른 글

240801~16 푼 문제  (0) 2024.08.17
240729~31 푼 문제  (0) 2024.07.31
240716~18 푼 문제  (0) 2024.07.16
240708~09 푼 문제  (0) 2024.07.09
240423~30 푼 문제  (0) 2024.04.23

CSS (Cascading Style Sheets)

- 크게 Selector와 Style로 구성되어 있음

h1 { color: green; font-size: 16px; }


- 여기서 h1은 Selector(선택자) 이고, color와 font-size는 속성, green과 16px은 값이다. color: green 과 같이 속성과 값은 하나의 Declaration(선언) 이 된다.


styled-component

css 문법을 사용하면서 결과물을 스타일링된 컴포넌트 형태로 만들어주는 오픈소스 라이브러리

# npm을 사용하는 경우
npm install --save styled-components

# yarn을 사용하는 경우
yarn add styled-components

다음과 같이 터미널에서 설치를 하면 된다.


기본적인 사용법

tagged template literal을 사용하여 css 속성이 적용된 리액트 컴포넌트를 만들어준다.

styled 컴포넌트를 사용하는 기본적인 방법은 다음과 같이 백틱스로 둘러싸인 문자열 부분에

css 속성을 넣고, 태그 함수 위치에는 styled.html태그 형태로 사용한다.

이러면 해당 엘리먼트 태그에 css 속성이 적용된 형태의 리액트 컴포넌트가 만들어진다.


tagged template literal

- literal : 소스코드에 고정된 값

- template literal : 리터럴을 템플릿 형태로 사용하는 자바스크립트 문법, 역따옴표 백틱을 사용

Tagged template literal은 앞에 나와있는 tag function을 호출하여 결과를 리턴한다.
Tagged template literal 예제


styled-components의 props 사용하기


여기서 props는 해당 컴포넌트에서 사용된 props를 의미한다. props로 dark가 전달되는 여부에 따라 색상을 다르게 할 수 있음


스타일 확장

RoundedButton의 styled 옆 부분을 보면 html 태그가 빠져있고, 대신 Button 컴포넌트가 적혀있다.

이는 Button 컴포넌트의 확장된 컴포넌트라는 뜻이다.


실습 : styled-components를 사용하여 스타일링 해보기

import styled from "styled-components";

const Wrapper = styled.div`
    padding: 1rem;
    display: flex;
    flex-direction: row;
    align-items: flex-start;
    justify-content: flex-start;
    background-color: lightgrey;
`;

const Block = styled.div`
    padding: ${(props) => props.padding};
    border: 1px solid black;
    border-radius: 1rem;
    background-color: ${(props) => props.backgroundColor};
    color: white;
    font-size: 2rem;
    font-weight: bold;
    text-align: center
`;

const blockItems = [
    {
        label: "1",
        padding: "1rem",
        backgroundColor: "red",
    },
    {
        label: "2",
        padding: "3rem",
        backgroundColor: "green",
    },
    {
        label: "3",
        padding: "2rem",
        backgroundColor: "blue",
    },
];

function Blocks(props) {
    return (
        <Wrapper>
            {blockItems.map((blockItem) => {
                return (
                    <Block
                        padding={blockItem.padding}
                        backgroundColor={blockItem.backgroundColor}
                    >
                        {blockItem.label}
                    </Block>
                )
            })}
        </Wrapper>
    );
}

export default Blocks;
import React from 'react';
import ReactDOM from 'react-dom';
import './index.css';
import App from './App';
import reportWebVitals from './reportWebVitals';

import Blocks from './chapter_15/Blocks';

ReactDOM.render(
  <React.StrictMode>
  <Blocks />
  </React.StrictMode>,
  document.getElementById('root')
);

// If you want to start measuring performance in your app, pass a function
// to log results (for example: reportWebVitals(console.log))
// or send to an analytics endpoint. Learn more: https://bit.ly/CRA-vitals
reportWebVitals();

다음과 같이 화면에 나타난다. 여기서 개발자 도구에서 스타일 부분을 수정해본다.


align-items를 strect로 변경해보았다. 그러자 다음과 같이 화면에 나타난다.

'React' 카테고리의 다른 글

[React] Appendix A. 리액트 버전18  (3) 2024.09.02
[React] react-router-dom v6  (0) 2024.08.30
[React] Context  (0) 2024.08.21
[React] Composition 방법과 Inheritance  (0) 2024.08.20
[React] 실습 : 섭씨온도, 화씨온도 표시하기  (0) 2024.08.19

+ Recent posts